
Necessary Items for the Project
Creating your own outdoor Christmas tree using lights is a breeze! You’ll be amazed at how simple it is and how quickly it can be done. Here’s your shopping list:
- A 1 ½” PVC Pipe
- T Posts – these need to fit into your pipe
- Outdoor String Lights for that festive sparkle
- Landscaping Staples to secure everything in place
- Spray Paint to add your personal touch
- A Reciprocating Saw or Cutting Knife for those necessary cuts
With these items, your unique Christmas tree will be up in no time!
List of Materials
Assembling an outdoor Christmas tree made of lights is a fun and straightforward task. You’ll need some everyday items to get this project rolling:
- A ½” sheet of sturdy structural plywood
- A 36″ steel construction stake for stability
- #8-32 x 2″ flat head zinc machine screws for secure fittings
- #8-32 type A zinc wing nuts for easy adjustments
- ½” staples to hold things together
- Exterior primer to prepare the surface
- Exterior paint to add color
- Exterior clear finish spray to protect your creation
And of course, outdoor string lights to bring your tree to life!
Required Tools
If you’re looking to create a dazzling outdoor Christmas tree made of lights, you’re in the right place. First things first, gather the necessary tools. You’ll need a simple wooden pallet, some wood screws ranging from 1″ to 2 1/4″, and don’t forget the paint and brushes for a splash of color. For a smooth finish, get your hands on some 60-80 grit sandpaper. Safety comes first, so ensure you have safety glasses. Lastly, to light up your tree, you’ll need E12/C7 light stringers and bulbs with an E12 base.
Read more: Christmas tree cyber Monday deals
A Detailed Walkthrough to Construct an Illuminated Outdoor Christmas Tree
Step 1: Sketch the design of the tree
To get started with your outdoor Christmas tree made of lights, the first step is to design your tree. Grab a pencil and sketch the outline of your tree on the upward-facing side of your plywood – think of this as the “back” of your creation. Why the backside? Well, a jig saw cuts on the upstroke, so any splintering will happen on the side facing up. By drawing and cutting on the back, you ensure that any splinters are hidden away from view.
Don’t worry too much about the drawing part – feel free to go freestyle, use a tape measure for precision, or even refer to an existing outline.

Step 2: Trim your wooden planks
Moving on to the second step of creating your outdoor Christmas tree, it’s time to shape your wooden planks. Keep in mind, safety first – make sure to wear protective glasses and be mindful of where you place your fingers while handling the plywood.
Place the plywood on your workbench with the front side down. If you don’t have clamps to secure it, no worries – this is a great time to recruit a friend for help. Follow the lines of your tree sketch with your saw to cut out the shape.
Be cautious not to damage your workspace as you reposition the plywood during the cutting process. If you’re using a power saw, remember to start the saw before it touches the wood, then gently push the blade into the wood to commence your cut.

Step 3: Erect the wooden tree structure
In the third step of building your outdoor Christmas tree, you’ll be setting up the wooden tree structure. But before you proceed, ensure that the wood glue you’ve applied has fully dried. Once it’s dry, lift the whole tree.
From the back, fasten it using 2½” screws. It’s crucial to drive a screw into each joint – this not only reinforces the wood glue but also keeps the screws hidden from the front view.

Step 4: Secure the base of the tree
In the fourth step of crafting your outdoor Christmas tree, we’ll be stabilizing the base. Take one of the 16 x 16” square plywood pieces and fasten it to the bottom of the tree. You’ll need two screws for this, inserted from underneath.
A handy tip – place the tree on a pair of sawhorses to easily reach the bottom. For extra support, cut two more pieces of wood and align them against the tree’s base. Secure them with screws, and there you have it – a sturdy base for your wooden Christmas tree!
Read more: Guide to Decorating a Christmas Tree: A Detailed Step-By-Step with Professional Tips

Step 5: Arrange your boards and apply paint
For the fifth step in creating your outdoor Christmas tree, you’ll be arranging your boards and adding some color. Start by laying out your boards row by row to achieve the tree shape you want. Don’t hesitate to cut some boards if needed to perfect the shape. Boards from the back of your pallet can come in handy here.
The gap between the slats that will form the tree shape is entirely up to you, though a spacing of about 1″ to 2″ is suggested.
Give the boards a good clean with 60-80 grit sandpaper to remove any unwanted bits. Be careful not to take off too much texture though. Now comes the fun part – painting! If you’re using multiple colors, plan out your color pattern ahead of time. Knowing which color each board should be will help streamline the painting process. To avoid any surprises, it’s a good idea to test paint colors on some leftover wood pieces first. This way, you can ensure you’re happy with the colors before you start painting your tree.

Step 6: Apply the finishing coat
In step six of building your outdoor Christmas tree, you’ll be adding the finishing touch. Once the paint has dried, it’s time to apply a finish to the faces, edges, and drilled holes of the tree. We’ve chosen a glossy exterior spray finish from Varathane for this job. It’s great because it completely covers the drilled holes, saving you the trouble of having to use a smaller paintbrush.

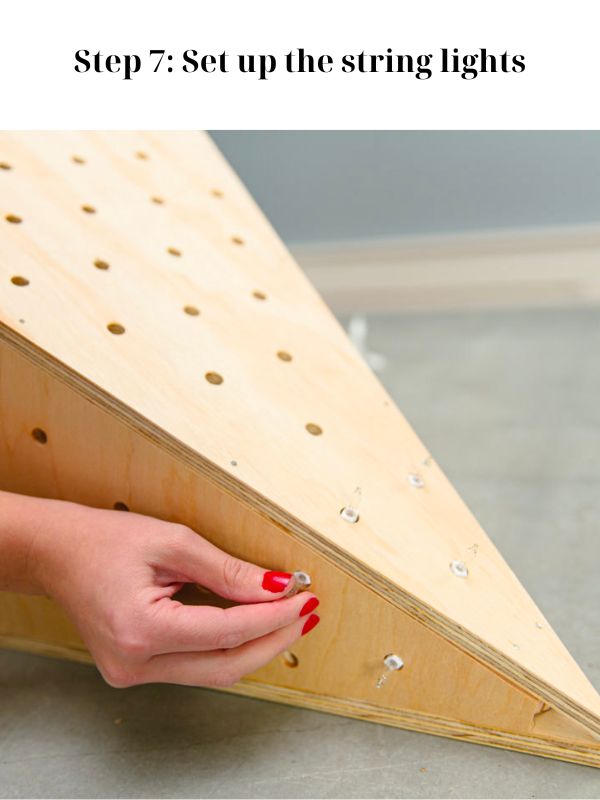
Step 7: Set up the string lights
For the seventh step of your outdoor Christmas tree project, we’ll be setting up the string lights. Begin by placing a few blocks on your work area. Lay your tree face down on these blocks or prop it up against something to ensure you can conveniently access both sides.
With the plug at the base of the tree, arrange the string lights. From the back of the tree, push individual lights through the drilled holes. Secure the wire with a ½” staple on either side of the bulb base, taking care to ensure that the staple goes over the wire, not through it.
You’ll want to repeat this process for all the drilled holes.
If you find yourself with some extra bulbs, neatly tuck them in the back and tidy up the wire. You can use tape as a clever way to hide the bulbs from behind.
As an alternative to a staple gun, you could use insulated cable staples and a hammer.
Instructions for Creating an Outdoor Christmas Tree Made of Lights

Step One: Select Suitable Lighting
Starting your outdoor Christmas tree made of lights is much like deciding on the best ingredients for a special dish. The first step involves selecting the most fitting lights. This choice is crucial as it sets the stage for your glowing masterpiece.
Step Two: Trim Your Tubes
Moving to the second step of creating your outdoor Christmas tree made of lights, you’ll need to trim your tubes. You’ll want a robust pair of scissors or a pipe cutter on hand for this task. Take the measurement of the pipe length that will fit your space perfectly, and mark this length with a pen or pencil. Proceed to make your cut using your chosen tool.
Precision in your cuts is key to achieving a polished and professional appearance for your final display. Also, don’t forget to take into account the diameter of your pipes – you want your lights to fit inside snugly. Keep these pointers in mind, and you’ll be set to tackle the next step swiftly!
Step Three: Make Necessary Notches
The third step in crafting your outdoor Christmas tree made of lights is to carve out the necessary notches in your wooden frame. Think of it like tailoring a suit – precision is key. Use a saw with a fine blade, and be careful with your cuts to prevent any damage to the wires or bulbs. The size and space between each notch might differ depending on the frame’s dimensions. When your notches are all set, it’s time to weave the lights through, making sure each bulb finds its snug spot.
Step Four: Color The Pipes
In the fourth step of building your outdoor Christmas tree made of lights, you’ll be adding color to the pipes. It’s akin to choosing the right dress for an event: you want a shade that enhances your overall design and is suitable for metal surfaces.
Opt for a spray paint specifically intended for metal to ensure a smooth and durable finish. Make sure to evenly paint each pipe, hiding any visible blemishes or imperfections. If you’re feeling a bit artistic and want to add some texture, feel free to play around with various painting techniques or use stencils to create unique patterns.
Step Five: Position T-Posts into the Ground
For the fifth step in your outdoor Christmas tree of lights creation, you’re going to set up the T-posts into the ground. Think of these posts as the backbone of your project – they bear the weight of the lights and stop them from drooping or toppling over. Start by determining the distance between each post, aiming for even spacing. Then, grab a post-hole digger or auger and carve out holes in the ground, at least two feet deep. Now you’re ready to place the T-posts into these holes, ensuring they are firm and upright.
Step Six: Calculate the Distance from the Base
In the sixth step of building your outdoor Christmas tree made of lights, you’re going to figure out the distance from the base. Think of it like arranging furniture in a room – you have to consider any oddities or obstacles in the space, such as corners or objects sticking out. Don’t forget to take note of any nearby power sources or switches. This ensures that plugging in your lights and switching them on or off will be a breeze. Use a measuring tape for precise measurements.
Step Seven: Fit in The Lights
In the seventh step of making your outdoor Christmas tree from lights, you’re going to arrange the lights. It’s like planning a road trip – you have to map out the route first. Know where each light will be placed and how they’ll connect to ensure a smooth setup process.
Stick to the manufacturer’s guidelines when connecting the lights and don’t forget to use the correct tools and safety measures. The brightness and color of the lights are also crucial factors to consider as they can significantly influence the final look of your festive masterpiece.
Step Eight: Link The Lights Together
Step eight in crafting your outdoor Christmas tree of lights is all about linking the lights together. It’s like assembling a puzzle – each piece has to be in its right place for the whole picture to come together.
Making sure the lights are correctly hooked to the circuit is crucial, or they won’t work. So, before you dive in, do a thorough check of all your connections. It’s always better to catch any misplaced pieces before the puzzle is complete, saving you from redoing parts of it later.
Now, connect the positive and negative wires between each bulb. You can use wire nuts or electrical tape, or simply twist the two wires together. Once everything’s securely linked, test the circuit to see if the lights shine bright.
Don’t forget to use a voltage meter to double-check everything before plugging into the power source. This ensures that all is well and ready. Once you’ve confirmed the circuit is functioning properly, sit back and admire your handiwork.

Hi, I’m Eugene B. Conley – the CEO of cybermondaychristmastree.com. I was born on December 13, 2000, and I’m a proud Sagittarius. I currently live at 3524 Reeves Street in Green Bay, WI 54301.
Before becoming the CEO of cybermondaychristmastree, I worked as a Meter Reader at The Pink Pig Tavern. While I enjoyed my time there, I had a passion for e-commerce and technology. I decided to pursue my dreams and started my own online venture.
At cybermondaychristmastree, we offer the best deals on Christmas trees during the Black Friday season, from Amazon to Walmart and many more. We help customers find the perfect tree for their homes at the most affordable prices, while also making their holiday shopping experience seamless.
Thank you for taking the time to read about me and my journey at Cyber Monday. I am committed to providing excellent service and quality products to all our customers.