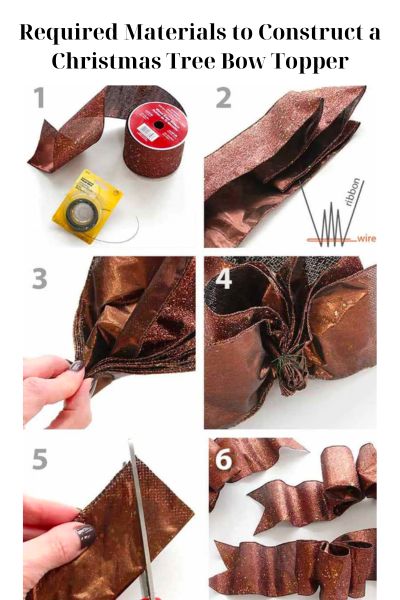
Required Materials to Construct a Christmas Tree Bow Topper
– 2.5 inch wired ribbon (25 yards)
– Floral wire or pipe cleaners
– Scissors
– Wire cutters
– Bowdabra bow maker (refer to a tutorial on how to make a wreath bow using a Bowdabra bow maker)
Procedure
Create a loop
– To create a loop, start by pulling about 6 inches (15 cm) of wired ribbon from the spool. Hold it tightly between your left thumb and forefinger.
– Now, with your right hand, pull more ribbon from the spool and shape it into a loop. Bring your hands together, then scrunch the bottom of the loop with the pinched ribbon.
– To secure the loop, twist the pinched ribbon in your left hand. For larger trees, aim for loops that are 10 to 12 inches (25 to 30 cm) long, so you’ll need approximately 20 inches (51 cm) of ribbon for each loop.
Remember to use wired ribbon, as it maintains its shape better. Lastly, twist the ribbon so that the decorated side is on the outside of the next loop.
– Pulling about 6 inches (15 cm) of wired ribbon from the spool. Pinch it tightly between your thumb and forefinger of your left hand.
– Now, using your right hand, pull more ribbon from the spool and form a loop. Bring your hands together, and scrunch the bottom of the loop with the pinched ribbon between your left hand’s fingers. To secure the loop, twist the pinched ribbon in your left hand.
Read more: cyber Monday artificial Christmas tree sales
Form a figure eight
- Take more ribbon from the spool using your right hand.
- Create a loop that goes in the opposite direction from the first loop.
- Join the bottom of the second loop with the pinched ribbon in your left hand and twist it clockwise to secure it.
- Make sure that both loops resemble the shape of the number eight, and that the second loop is the same size as the first one.
- Hold the loops against the tree to determine if the bow will fit correctly.
Expand your bow
Expand your bow by continuously making alternating loops until you feel it is complete. You have the flexibility to choose the number of loops, with ten loops creating a fancy bow being one option. To ensure a tight hold, remember to pinch and twist the bottom of each loop. With your left hand, scrunch up the bottom of all the loops between your thumb and forefinger. Also, ensure that the decorated side of the ribbon faces outward for each loop.
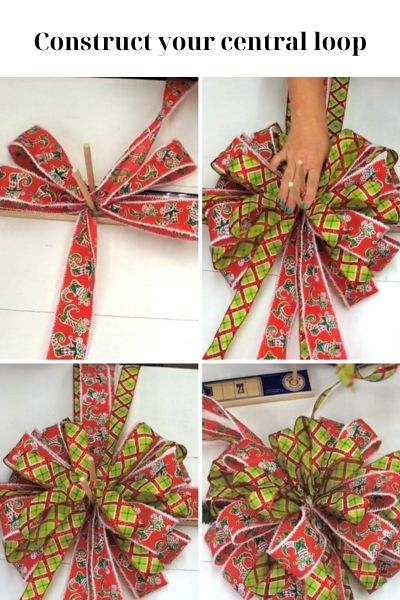
Construct your central loop
Construct your central loop by taking the last loop you created. Hold the bottom part of the loop in your left hand and twist it, just like the other loops.
Secure your loops jointly
Secure your loops jointly by shaping a piece of floral stem wire into a “u” shape. Insert the loose ends into the central loop of your bow and bend them around the bottom part. Pull the ends through the “u” part of the wire and tighten the knot by pulling the loose ends in opposite directions.
To ensure a secure fastening, twist the wire ends multiple times. Repeat the same process with another piece of floral wire to attach your bow to the top of your Christmas tree.
Choose a floral stem wire color that matches your bow, such as green, silver, or white. For optimal thickness and moldability, it is recommended to use twenty-six gauge floral stem wire for securing bows.
Read more about DIY: How to make your own Christmas Tree Stand?
Preparing the Streamers
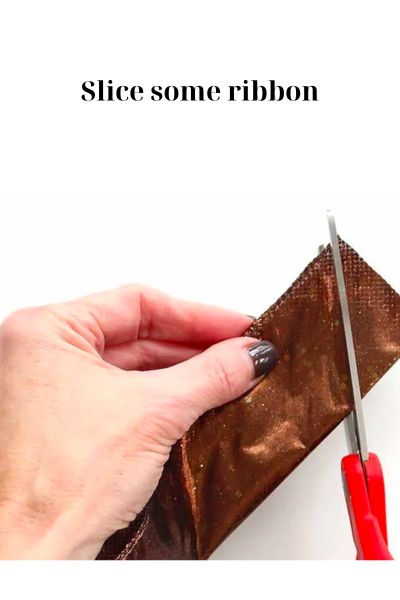
Slice some ribbon
To cut the ribbon, start by measuring at least four lengths from your spool. For a neat finish, fold the sides of one streamer in half from the inside and make a diagonal cut at the bottom, starting from the outside to the inside.
Attach your streamers to your tree
Attach your streamers to the Christmas tree by tightly wrapping floral stem wire around the top of each streamer. Make sure to pull the excess wire in opposite directions for a secure hold. Hide the tops of the streamers under the bow and attach them to the tree branches.
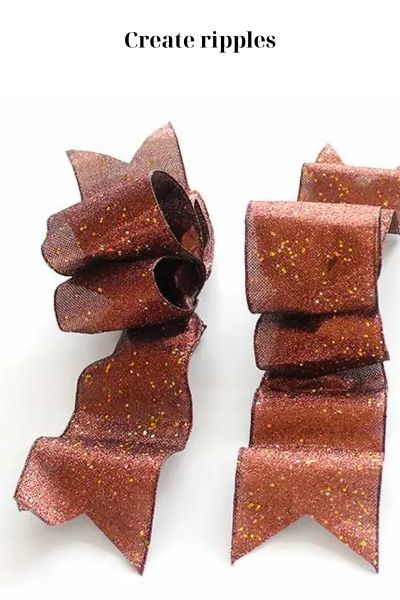
Create ripples
To create ripples with your streamers, place a paper towel roll under the ribbon and smoothly tuck the rest of the tail underneath.
Remember not to press or pinch the streamers, as excessive manipulation can cause unwanted ripples that won’t showcase your waves effectively.
Additionally, avoid going overboard with the waves, as too many can make the streamers appear stiff.
Ensure the remainder of your streamers are fixed
Ensure the remainder of your streamers are securely fixed by following these steps:
- Place a paper towel roll under the ribbon and smooth the tail underneath, using smooth movements and avoiding pressing or pinching the streamers.
- Remember not to go overboard with the waves as too many can make the streamers look rigid.
Advice
For a bow that maintains its shape, opt for wired ribbon. Elevate the appearance by incorporating bells, dried fruits, glitter, or layering different color bows. Streamers should be approximately a yard and a half in length to fit a standard-sized tree.
Caution
Make sure to firmly pinch the center of your bow during its creation to prevent unraveling. Also, bear in mind that the streamers will shrink when you craft waves. It may be wise to begin with slightly longer streamers to account for the length reduction.

Hi, I’m Eugene B. Conley – the CEO of cybermondaychristmastree.com. I was born on December 13, 2000, and I’m a proud Sagittarius. I currently live at 3524 Reeves Street in Green Bay, WI 54301.
Before becoming the CEO of cybermondaychristmastree, I worked as a Meter Reader at The Pink Pig Tavern. While I enjoyed my time there, I had a passion for e-commerce and technology. I decided to pursue my dreams and started my own online venture.
At cybermondaychristmastree, we offer the best deals on Christmas trees during the Black Friday season, from Amazon to Walmart and many more. We help customers find the perfect tree for their homes at the most affordable prices, while also making their holiday shopping experience seamless.
Thank you for taking the time to read about me and my journey at Cyber Monday. I am committed to providing excellent service and quality products to all our customers.